
SHEER CLAMPS AND BOARD SELECTION
April 30, 2020
What is a sheer clamp?
If a boat has ever caught your eye, you have probably admired its "sheer". In profile, the sheer line runs from bow to stern where the hull and deck meet. It is one of the most distinctive visual features of a boat. The thick blue line in the image below highlights what Burnett's sheer line should eventually look like.

An important structural component of the boat runs along the sheer line - the sheer clamp. In addition to adding strength to the boat in a location where it is susceptible to impacts (the sheer would likely be the first point of contact if the boat were to hit a piling or a larger boat), the sheer clamp is used to make a strong connection between the hull and the deck of a boat. By securely fastening the deck to the hull via the sheer clamp, the deck contributes a great deal of stiffness and strength to the boat while still performing its more obvious tasks of shedding water and supporting sun bathers. In the below photo, where a crew of good friends are helping flip over the Dipper, the people with their hands over their heads have their thumbs wrapped around the starboard-side sheer clamp, and the port-side sheer clamp contributes some of the strength needed to rest the boat on-edge during the rollover.

Wood for Burnett's Sheer Clamps
Burnett's sheer clamps will be made of Douglas fir, a species native to our location that produces wood known by boat builders to have good rot-resistance and to be fairly strong for its density. But not just any fir boards will do for Burnett; we wanted clear, vertical-grain, straight-grain, dry boards that are free of sapwood and checks. Let's explore what exactly that means and why it was important for us to be that picky.

~$500 worth of clear, vertical-grain Douglas fir boards en route from the mill to the shop
The Anatomy of a Tree
This might be a good point to acknowledge that neither Spencer nor I are experts in naval architecture, structural engineering, dendrology, wood technology, wood working, boat building, sailing, or pretty much anything related to the project, really. So these blog posts will be a snapshot into the simple and ever-evolving understandings of a geologist and a fishing guide who are trying to build a sailboat; take any technical content with a grain of salt, and feel free to contact us with feedback if you think we have wandered astray.
Trees grow outward from their central pith. In the temperate climate where the fir trees that yielded our sheer clamps grew, trees grow in cyclical pulses due to seasonal variability in the availability of sunlight and water. Cyclical growth results in distinct growth rings visible in the cross section of a tree trunk, and hence the ability to approximate the age of a tree by counting its rings (see photo and inset below). The outer rings of the tree are sapwood, the living part of the tree where sap and water are transported, whereas the interior rings are heartwood, which is composed of dead cells and functions as structural support for the tree. As new growth rings are being added underneath the bark at the outside of the tree, older rings are undergoing a conversion from sapwood to heartwood from the center of the tree outwards. Douglas fir heartwood's distinctive reddish colour makes it easy to distinguish from the sapwood, as seen below.

Armed with an understanding of tree anatomy, we are now ready to talk about different types of boards that can be cut from a tree and how they differ in their suitability for boat building.
Clear Lumber - Clear lumber is free of knots. Knots exist where branches once protruded from a tree trunk and are often a point of weakness in a board. Because our intention is to bend the shear clamps along the shear line to add strength at that location, boards with knots are not suitable.

KNOT
Dry Lumber - When a board is cut out of a recently felled tree that wasn't dead standing, the moisture content of that board is high and typically not at equilibrium with the atmosphere. The board will gradually dry out, and will shrink as it dries. If we were to use wet wood to build our boat, the parts of the boat would change shape (shrink and twist) after being installed and in effect would try to pull apart from one another. Wet wood is also more susceptible to rot, which is to be avoided in a wooden boat that we want to take across oceans! We therefore had our lumber kiln dried (put in a big oven) to drive down the moisture content.

This spruce board was cut out of a wet log and started out as a flat, square board. It has since shrank and warped into its current state while drying.
Vertical Grain Lumber - Vertical grain lumber is cut so that the grain of the wood is oriented perpendicular to the wide face of a board, whereas in flat grain lumber the grain runs parallel to the wide face (see below photos). Vertical grain lumber shrinks and swells less with change in moisture content (is more "stable") because wood shrinks less radially (perpendicular to the grain in the below photos) than tangentially (parallel to the grain in the below photos). Stable wood is good because shrinking and swelling puts stress on the glue joints holding the pieces together, as well as the finishes that coat and protect the wood.

Vertical Grain
Flat Grain

Straight Grain Lumber - In straight grain lumber the grain of the wood runs parallel to the length of the board. If this is not the case, the board has "grain run-out", and is not as strong.
This board is vertical grain, but the grain runs out at an angle to the edge of the board.

Heartwood Lumber - Heartwood is less susceptible to rot than sapwood, so any lumber used in Burnett will be free of sapwood.
This flat grain fir board has both heartwood (reddish, central) and sapwood. Fungus (grey spots) has selectively established itself in the sapwood.

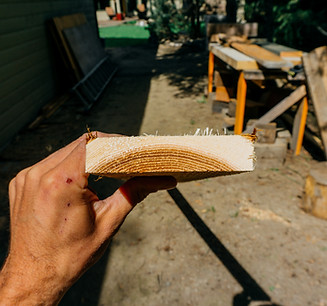
Checks - Checks are cracks that form in a log due to shrinkage as it dries. Logs dry more quickly along the grain out their ends than radially, so it is common for the ends of a log to have checks if it sat for a while prior to being milled.
This old, dry timber has a large check radiating from the central pith.

Add all those attributes together and you find yourself paying more than a dollar per foot for a 1" by 3" board!
Bringing Rough Lumber to Finished Dimensions
The lumber we ordered was thicker and wider (1" x 3") than needed for our sheer clamps (3/4" x 2 1/2"). Starting with slightly larger boards allowed for shrinkage in the kiln and let us selectively cut out some of the unwanted "defects" in the boards (e.g. sapwood and knots). We used our table saw and thickness planer to bring the boards down to their final dimension, and our miter saw to trim any checks off of the ends of the boards.


Cutting the Scarf Joints
Burnett's sheer clamps are ~32 feet long. The lumber we got from the mill was ~20 feet long, so we had to scarf two boards together to get long enough pieces. We used scarf joints to join the boards for the same reasons they were employed when joining plywood sheets end to end: to get enough glued surface area for a strong joint, but to have uniform mechanical properties so that they follow smooth curves when bent. Unlike the unwieldy 4' by 8' and 5' by 10' plywood sheets we scarfed together for hull panels, the fir boards for the sheer clamps are small enough that the work piece can be brought to a stationary tool, our table saw, to cut the scarf joint. We built a sled jig to hold the work piece in place at the desired angle, and with fingers uncomfortably-close to the saw blade, very carefully made the 16 cuts we needed to make.


We found Russell Brown's book on scarfing to be a great step-by-step guide when scarfing both plywood and dimensional lumber, and would recommend it to any potential builders who are trying to wrap their heads around the process.
Ready to Become Part of the Boat!
Though we haven't stress-tested our scarfs yet, the joints appear to have been a success. Burnett's shear clamps will be a lamination of two of the 3/4" by 2 1/2" pieces, and the boat will also have an intermediate sheer clamp at the seam between the two uppermost hull panels. But we will get to that in a future blog post.

Click here to see more photos

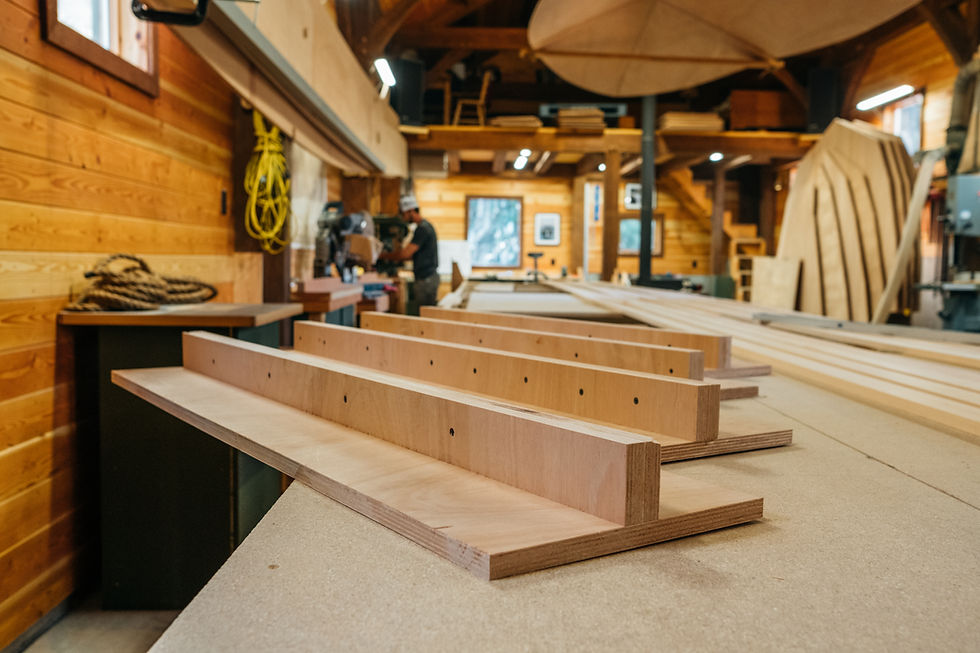
Gluing the Scarf Joints
The process of gluing scarf joints between fir boards for the sheer clamps was the same as for the plywood scarfs: coat both faces with unthickened epoxy and let it soak into the wood, apply thickened epoxy to one surface of the joint to fill any irregularities, then line the pieces up and clamp them until the epoxy cures. We built T-shaped clamping jigs to make aligning and clamping easy.